
Android Testing Tools
In the last blog, we discussed the importance of making tests for our software’s developments. We also introduced which of them are the most common and widely used, and our first steps developing them in Android. These steps were shown on Android Studio; therefore, we can assume it is the best choice, but does it really is?
Now we are going to introduce some of the benefits of using this IDE thanks to native tools provided on the SDK (Software Development Kit). We will also see how they can be useful and our first contact with them.
Benefits from using Android Studio
- Implement Frameworks
As we mentioned, Android Studio is user-friendly, and it allows you to implement third-party frameworks too.
But what is a Framework?
A software framework provides methods and classes developed by other programmers which help implement a functionality easily. Therefore, using a framework can be time saving.
Those Frameworks can be useful to create an application, or as in our case, to test them. Some of the most famous testing frameworks are the following.
This framework makes the execution of automated tests possible on applications following a grey-box test model. With it you can simulate user interaction, do clicks, search for a specific text or fill in a text field. This framework can be added to Integrated Development Environments (IDEs) such as Eclipse.
As a grey-box testing framework Robotium requires having an Android project with the application source code on which we want to perform the tests.
It is a framework developed by Google that makes it possible to carry out tests on the user interface. One unique feature is that it allows to obtain an instance of the device on which the test is run, which makes it possible to interact with it by clicking on the device’s physical buttons, as well as changing its settings or accessing its files. Therefore, this environment allows not only to test an application but also to analyze the interaction that it produces with the rest of the system, including other applications.
This framework focuses on interacting with an application, its activities and its views. Furthermore, it can be used to search for elements that match a given characteristic and interact with them by clicking or filling in text fields. In addition to that, it allows you to verify events that took place. That is to say, these events require prior knowledge about the application running on the developer’s side. Moreover, although Espresso supports black-box tests, it is better to utilize a grey-box testing approach; since they will get the most out of the tests.
Espresso and UIAutomator are native tools included in Android Studio and only need to be added in the “build.gradle” configuration file to be able to use them.
As a personal recommendation, I would suggest using Espresso if you had the app code or any information about the app’s elements. In case you want to run tests on third party apps, what is an uncommon case but e.g., for auditing purposes, the only way to do it is using UI Automator. This is because UI Automator enables you to find UI elements based on rules on the “Selector” parameter.
2. Native testing tools on Android Studio.
Android Studio also provides some native tools developed by Google that can be really useful in some cases.
Android Emulator emulates a real Android device. To further elaborate, it is one of the fastest and lighter emulators among all the others. However, what will really make you decisive about choosing it is its ease of use and implementation.
How to run:
- Open a project.
- After the project is open, click on the first button as shown in the picture below.
- Choose the divide where the application or the test will take place
- Click on the second button to run
P.S: Remember from last blog that tests will run by default with AndroidJUnitRunner.

Illustration 1: Android Studio’s menu to run Android Emulator.
Why to use:
As tests can be performed graphically or programmatically, the Android Emulator can show you how your test is being performed graphically. To clarify, this will show you how the test is clicking on elements or doing drags on the display to verify if the response is as expected.
This tool can be helpful in order to understand how third-party apps implemented a certain element of its UI. Additionally, you can take a screenshot of what the Android Emulator or physical device is showing and then click on each element to know more about its characteristics; that will be represented in the bottom box (it can be found on illustration 2).
How to open.
Opening UIAutomatorViewer may depend on the OS, but usually it can be found in the Android folder (the destination of the installation of the Android Studio). On the macOS, it is usually located in the Library folder; just search for Library/Android/sdk/tools/bin/uiautomatorviewer and it will open. Then click on the top-left icon (1) to take the screenshot.

And depending on the app running on the emulator/device, something similar to the next image, will be shown.
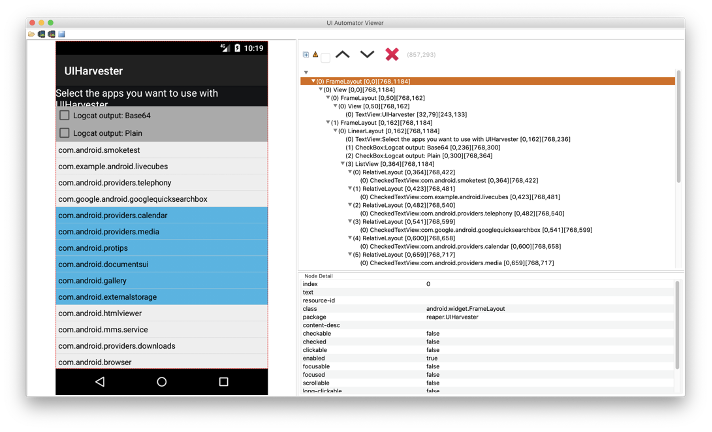
Illustration 2: AutomatorViewer’s UI running an app called ‘UIHarvester’.
So, by clicking on each element, its characteristics will be presented in the bottom box. This can be valuable information in order to know more about the element’s hierarchy of third-party apps. Hence, this information can be used as a guide to create your own app, to conduct tests manually, or use automated testing tools that are able to run on any app.
- Automated Testing tools
Creating and conducting your own tests, for each situation, can be time-consuming and inefficient, compared with using or creating an automated testing tool, which are also known as “Monkeys”.
Those tools interact with the UI elements and are usually used to find bugs and crashes. Furthermore, Android has already taken actions regarding this matter and has developed “Exerciser Monkey”, also commonly known as “Android Monkey”. It is a pseudorandom tool, which means its interactions follow no logic. It is also capable of performing clicks, dragging, opening the keyboard, and even performing system events.
How to run and use.
It can be launched via adb through a command line by typing the following command. “-p package” lets you choose the application to run on, and “-v 500” sets the number of interactions to 500.
$ adb shell monkey -p your.package.name -v 500
It will work on the emulator or physical device connected through USB. If there are more than one emulator or one device running, then it is necessary to change the command to the following:
$ adb [-d | -e | -s serial_number] shell monkey -p your.package.name -v 500
P.S: “serial_number” can be identified with $ adb devices command
You can delve more into the subject on this link:
Exerciser Monkey can be considered as a black-box testing tool due to its pseudorandom characteristic. That is to say, it doesn’t need to know about the internal processes of the app or its architecture. As a result, it can be used in any application.
![]() Android Testing Tools por davidrtorrado está licenciado bajo una Licencia Creative Commons Atribución-NoComercial-SinDerivar 4.0 Internacional.
Android Testing Tools por davidrtorrado está licenciado bajo una Licencia Creative Commons Atribución-NoComercial-SinDerivar 4.0 Internacional.