
Logcat: Mining execution logs in Android
Logs are messages that show events occurring in an operating system or other software sources such as apps. In this post we will focus on Logcat, which is an Android developing tool to show those log messages.
Why are logs useful for?
We can distinguish between several kinds of logs depending on their origin.
First, we will talk about logs related to the Android OS internal events. These logs provide details about executions in inner layers of the operating system. In turn, they are split in different classes which we will talk about in detail in the “Logs structure in Logcat” section. Those logs are important in order to understand root causes for OS malfunction.
Also, app’s logs are really interesting if you are developing an app from scratch or trying to understand how a third party app works or why it fails. In a crash case, or if an action is not working, it might be interesting to get access to logs in order to understand when the program stopped and get a general idea of what might be causing it.
To achieve this, the starting point would be to know how to see logs and how to interpret them.
How can I access Logcat?
As we said, Logcat is an Android developing tool to see logs. That is why firstly we need an Android OS running in an emulator or a physical device.
There are two extended ways to get access to Logcat, through Android Studio or through command line.
The way to get access on Android Studio is by selecting: View -> Tool Windows -> Logcat
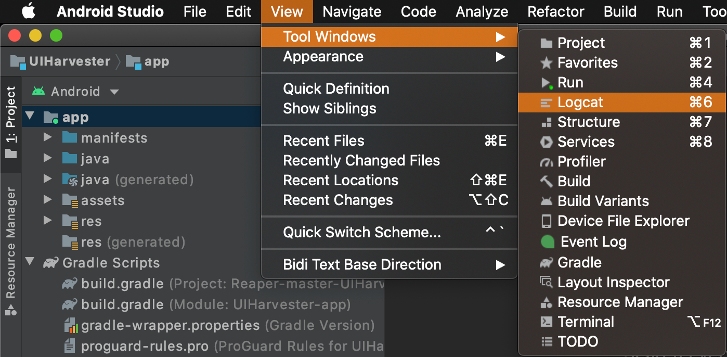
Then, a bottom view is deployed, where we can choose between the different devices plugged in by USB or emulators running in the drop down list (red menu in the image below). Note that USB debugging must be selected in developer mode on the device. Also the emulator must be running in order to show up

In this window, logs will be printed in real time. This might be a problem because in real devices up to tens of logs are printed every second, which hinders the process of finding a concrete activity. This can be solved by clicking the right sided menu (blue one) to create a filter configuration. Here you can filter by tag, message, package name or PID (process ID).
Another way to find Logcat with no need of Android Studio is through the command line. This can be reached via adb just by entering
# adb shell logcat
The terminal window will start printing all logs listening via adb until you exit pressing ctrl+C.
Logs structure in Logcat
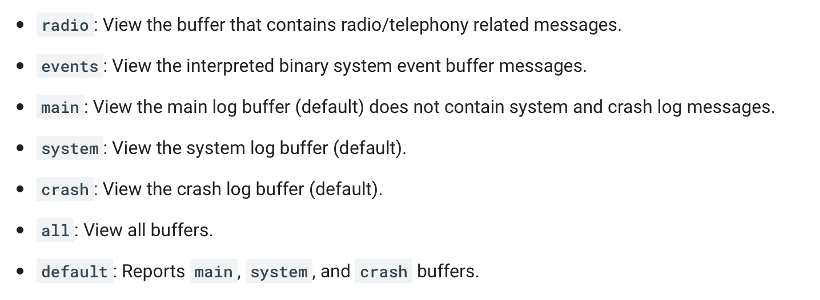
By default, logs are saved in buffers and organized by their origin. So initially, system, crash and main buffers are dumped in the console. Then they can be selected from different choices by adding the option [-b <buffer>] following the logcat command.
Logs are differentiated with the structure “priority/tag”: “message”
Priorities[1] are as follows from less to higher:
Verbose < Debug < Info < Warning < Error < Fatal < Silent
Tags usually refer to the method being executed.
Finally, message is the information provided by the developer to clarify what is happening.
How to use Logcat
As you can imagine the structure can be also a filtering parameter.
Filtering by Tag:
# adb logcat -s “Tag”
Filtering by priority:
# adb logcat *:Priority
For example:
# adb logcat *:W
This command will show any log with Warning or higher priority.
But if we are trying to understand a third party app all default logs just bother us in our mission to find the concrete app logs. This can be solved by filtering the app package with the command:
# adb logcat com.example.example:<log level> *:S
Where <log level> must be exchanged by the priority level
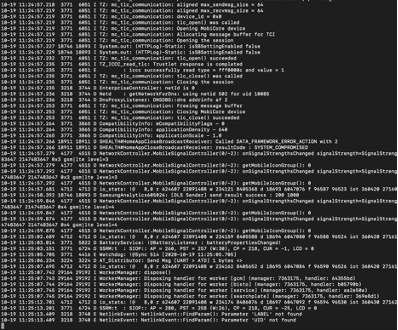
As the Terminal Window might be difficult to read, there is a useful option to interpret it more easily. The format modifiers allow changing logs to different colors depending on their priorities.
# adb -v color
The result will be the following:

How to implement logs
Now that we know what logs are, their importance and why it might be interesting to add them to our app, we need to know how to implement them in our code.
There is a Log class in Android that allows you to add entries to Logcat. The methods depending on the priority level are:
Log.v(String “tag”, String “message”) -> Verbose Level
Log.d(String “tag”, String “message”) -> Debug Level
Log.i(String “tag”, String “message”) -> Information Level
Log.w(String “tag”, String “message”) -> Warning Level
Log.e(String “tag”, String “message”) -> Error Level
As we already mentioned, a common practice is to match the tag with the method name that is being executed. This way, if a crash occurs any person who has access to Logcat will be able to know where the problem is. Also the message should provide detailed information about what has happened or what is going to happen next.
For example, by adding in our code:
Log.d(“MainActivity”, “HTTP request created”);
We provide information about the processes running in our app and the method being executed. In this case in MainActivity, a HTTP request has been created, dumping this message into the Logcat as a debug log.
This post has been authored by David Rodríguez (GitHub, LinkedIn), who is carrying out his undergraduate thesis entitled “Desarrollo de una prueba de concepto para la ejecución automática de aplicaciones Android” under the supervision of Danny S. Guamán and José M. del Álamo.
About Jose M. Del Alamo
![]() Logcat: Mining execution logs in Android por jmdelalamo está licenciado bajo una Licencia Creative Commons Atribución-NoComercial-SinDerivar 4.0 Internacional.
Logcat: Mining execution logs in Android por jmdelalamo está licenciado bajo una Licencia Creative Commons Atribución-NoComercial-SinDerivar 4.0 Internacional.